Collaborative Coding with Git & GitLab
I’ve been asked by more than one person about how to use git and merge requests for collaborative scientific coding. Here are my notes for me to refer back to later and for me to point people to when I spend time teaching them how to do this.
What and Why?
Version control is the lab notebook of the digital world: it’s what professionals use to keep track of what they’ve done and to collaborate. Every large software development project relies on version control, and most scientists and engineers use it for their work as well. But, it isn’t just for software: books, papers, small data sets, and anything that changes over time or needs to be shared can and should be stored in some sort of version control system.
A version control system keeps track of these changes for us by creating different versions of our files. It allows us to decide which changes will be made to the next version (each record of these changes is called a commit), and keeps useful metadata about them. The complete history of commits for a particular project and their metadata make up a repository. Repositories can be kept in sync across different computers which facilitates collaboration among different people.
Version control is an unlimited ‘undo’ button, but it also allows many people to work in parallel.
How?
Ok, so how do we actually do this? At the moment most people use git and so that is what we will focus on here, but keep in mind that there are other version control systems out there.
Creating an repository
Setup
When we use git on a computer for the first time, we need to configure a few things:
$ git config --global user.name "your name"
$ git config --global user.email "you@thereis.noplace.likehome"
Please use your own name and email address instead of my dummy ones. From here on in this user name and email will be associated with your login and will be used for all your subsequent git activity.
It is also a good idea to set up which editor git should use on this machine too:
git config --global core.editor "vim"
You can check your settings at any time:
git config --list
Create something
First, let’s create a directory in our home dir to do some work in:
cd ~/
mkdir the_next_spaceX
cd the_next_spaceX
Then we tell git to make this dir a git repository – that is a place where git can/should track and store versions of our files:
git init
Note - this is only needed at the root dir of a project as git tracks all subfolders of this dir.
Now lets look at what that has done:
ls
Hmm… nothing…????
well, lets look a little closer:
ls -a
It turns out that git has created a hidden directory within our dir called .git.
Git uses this hidden subdirectory to store all the information about the repo, including all files and sub-directories located within the project’s directory. If you ever delete the .git subdirectory you will lose the all of the repos’s history. It is an important dir.
Check that everything is set up and working:
git status
This has to be one of my most typed git commands as it tells you what git is doing and thinking. We will talk about what all this output means soon.
Tracking your work
Ok so you should be in our the_next_spaceX directory and ready to do some cool work.
Let’s create a file called mars.txt that contains some notes about the planets suitability as a base. We’ll use vim to edit the file (you can use whatever editor you like).
vim mars.txt
Now check it has been created properly:
ls
yep it is there. So, what does git think about this file?
git status
Git tells us that it’s noticed the new file but that it is untracked. untracked files just means that there’s a file in the directory that Git isn’t keeping track of and we need to decided if we want git to care about it or not. Tell Git to track a file using:
git add mars.txt
and the check that it worked:
git status
So, now git now knows that we want it to keep track of mars.txt, but it is telling us that it hasn’t recorded the changes we made to it as a commit yet. To get it to actually record the changes, we need to run one more command:
git commit -m "Started my notes on Mars as a base"
When we run git commit, git takes everything we have told it to save by using git add and stores a copy permanently inside that special .git directory. This permanent copy is called a commit and its short identifier is some unique number/letter combo like f22b25e. This identifier allows us to find this point in history later.
Just a few explanatory notes - the -m flag (for “message”) is used to record a short descriptive comment that will help us remember what we did and why. If we just run git commit without the -m option then git will launch our pre-set editor and ask us to type message. Good commit messages start with a brief (<50 characters) statement about the changes made in the commit. I like to use semantic commit messages but you can use whatever you like - some people prefer sentences like “If applied, this commit will…”. Always write more than you think is needed.
What has this commit done:
git status
It has put all our changes into git and the message tells us that git is up to date with the files in this folder.
If we want to know what we’ve done recently, we can ask Git to show us the repo’s history:
git log
This lists all commits made to a repository in reverse chronological order and shows you the long versions of those commit identifiers mentioned above.
History and how to undo-it
As we mentioned above - we can refer to commits by their identifiers. You can refer to the most recent commit of the working directory by using the identifier HEAD.
(N.B. make some random changes to the file here so that it is different and these examples work…)
Lets look at our work progress using the HEAD reference:
git diff HEAD mars.txt
This is the same as if you leave out HEAD (try it). The point of showing this it to make it clear that we can refer to previous commits. An easy way to look at the difference between now and previous commits is by adding ~1 (where “~” is “tilde”, pronounced [til-duh]) to refer to the commit one before HEAD.
git diff HEAD~1 mars.txt
If we want to see the diff between even older commits we can use git diff again, but with the notation HEAD~1, HEAD~2, HEAD~3, and so on:
git diff HEAD~3 mars.txt
If we aren’t interested in the specific difference between commits we can use git show which shows us what changes we made at an older commit as well as the commit message that we wrote at the time:
git show HEAD~3 mars.txt
But what if we don’t know how many commits ago the change we’re interested in was? Well we can also refer to commits using those long strings of digits and letters called identifiers that git log displays:
git diff f22b25e3233b4645dabd0d81e651fe074bd8e73b mars.txt
So we can see what we’ve changed but how can we restore older versions of things? Let’s suppose we change our mind about the last update to mars.txt and want to roll-back to a previously committed version.
Lets look at the status of our git repo to see where we’re at:
git status
We have un-staged changes and we will now put things back the way they were:
git checkout HEAD mars.txt
git checkout checks out (i.e., restores) an old version of a file. In this case, we’re telling git that we want to recover the version of the file recorded in the HEAD commit, which is the last saved commit. If we want to go back even further, we can use a commit identifier just like we did with diff and show above:
git checkout f22b25e mars.txt
Lets see what our git system is thinking about all this jumping around:
git status
This shows us that the file has been changed and are now sitting in the staging area ready for us to do something with.
Word of warning…
There is a risk of getting in to a ‘detached HEAD’ state when moving back in time with git.
We can to revert our file to its state in a previous commit, but be careful! The command checkout has other important functionalities within git and it is easy for git to misunderstand your intentions if you are not very accurate with what you ask for. For example, if you forget to add the filename - eg. mars.txt in the previous command, you will get an error saying something about:
You are in 'detached HEAD' state. You can look around, make experimental changes and commit them, and you can discard any commits you make in this state without impacting any branches by performing another checkout...
Don’t panic - the “detached HEAD” state is like “look, but don’t touch” space where so you shouldn’t make any changes in this state and after investigating your repo’s past state you should reattach your HEAD with git checkout master.
Completely reverting a committed change
The above checkout commands allow you to modify one file in the stage area but what if you want to completely revert a commit?
Lets say that the last commit to the project’s repository contained an error and you wants to undo it. git revert [erroneous commit ID] will create a new commit that reverses the erroneous commit. Therefore git revert is different to git checkout [commit ID] because git checkout returns the files within the local repository to a previous state, whereas git revert reverses changes committed to the local and project repositories.
Ignore stuff
We almost always have files that we do not want git to track for us - like backup files created by our editor or large data files
(N.B. Let’s create a few dummy files so we have something to ignore…)
mkdir results
touch a.dat b.dat c.dat results/a.out results/b.out
Lets see what git sees now:
git status
Now let’s pretend that putting these files in git would be a waste of disk space, so let’s tell git to ignore them.
We do this by creating a file in the root directory of our project called .gitignore:
vim .gitignore
add the following to this file:
*.dat
results/
These wildcard patterns tell git what to ignore. Now that we have created this file we need to commit it to our repo so that it stays with our repo.
I almost never craft a .gitignore manually and I almost always steal them from other people - see lots of examples here: https://github.com/github/gitignore
Remotes
Version control really comes into its own when we begin to collaborate with others. We already have most of the machinery we need to do this. The only thing missing is to copy changes from your local repository to another repository on another machine/place.
The beauty of git is that it allow us to easily move work between any number of repositories in any location. In practice, though, it is much saner/easier to use one copy as a “central hub”, and to keep it on the web rather than on someone’s private machine/laptop. Most people use online hosting services like GitHub, Bitbucket, or GitLab, to hold those central or master copies of the repo.
Let’s start by setting up a GitLab repo for sharing the changes we’ve made to our current project with the rest of the team. Log in to GitLab.com, then click on the “New Project” icon in the top right corner then create a blank project called the_next_spaceX.
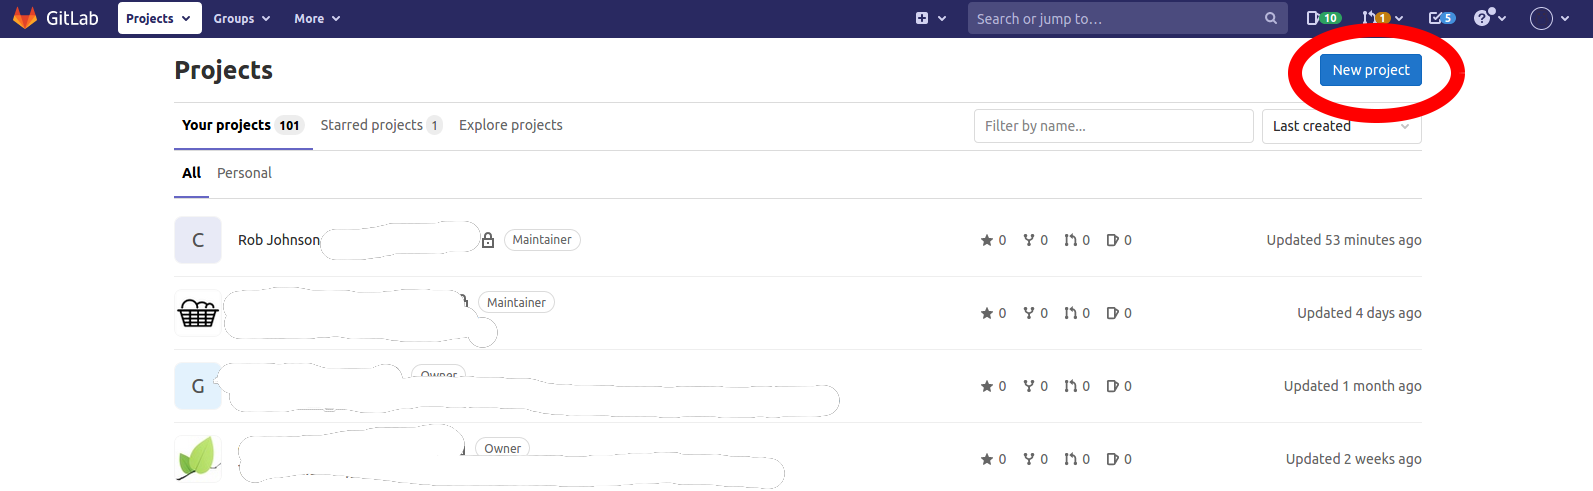
As soon as the repository is created GitLab displays a page with a URL and some information on how to configure your local repository.
What you have effectively done is the following on GitLab’s servers:
mkdir the_next_spaceX
cd the_next_spaceX
git init
and have created an empty git repo with your projects name. Now we need to connect our local git repo with the new, but empty, GitLab one. We do this by making the GitLab repository a remote for the local repository. The home page of the repository on GitLab includes the command you need to run on your machine:
git remote add origin git@gitlab.com:ccfp1/the_next_spacex.git
Note - origin is a just a name used to refer to the remote repository. It could be called anything, but origin is a convention that is often used by default in git and GitLab, so it’s helpful to stick with this unless there’s a reason not to.
We can check that the command has worked:
git remote -v
Once the remote is set up, this command will push the changes from our local repository to the repository on GitLab:
git push origin master
We can pull changes from the remote repository to the local one as well:
git pull origin master
We now have a way to share (some people call it ‘inflict’) your code with others.
Collaborating
For this part it is good to work in pairs… One person will be the “Owner” and the other will be the “Collaborator”. The goal is that the Collaborator add changes into the Owner’s repository.
(Note - the Owner needs to give the Collaborator access to the repo)
Now the Collaborator needs to download a copy of the Owner’s repository to their machine. This is called “cloning a repo”. To clone the Owner’s repo:
git clone https://gitlab.com/ccfp1/the_next_spacex.git ~/the_next_spacex
The Collaborator can now make a change in their clone of the Owner’s repository, exactly the same way as we’ve been doing before:
cd ~/the_next_spacex
vim pluto.txt
Now add this to your local copy of the repo:
git add pluto.txt
git commit -m "Add notes about Pluto"
Now we share this back with the remote repo by “pushing” the change to the Owner’s repository on GitLab:
git push origin master
Ok, so now look to the Owner’s repository on GitLab website now. You should be able to see the new commit made by the Collaborator.
Now you as the owner can download the Collaborator’s changes from GitLab:
git pull origin master
Now the three repositories (Owner’s local, Collaborator’s local, and Owner’s on GitLab) are in sync.
A Basic Collaborative Workflow:
In practice, it is good to be sure that you have an updated version of the repository you are collaborating on, so you should git pull before making our changes. The basic collaborative workflow would be:
- update your local repo with
git pull origin master, - make your changes and stage them with
git add, - commit your changes with
git commit -m, and - upload the changes to GitLab with git push origin master
It is better to make many commits with smaller changes rather than of one commit with massive changes: small commits are easier to read and review.
Branching
How do we all work on the same code/repo/project at the same time without clobbering each other… enter branching…
I think GitHub Flow is a good and simple way to do this, but there’s a lot of different workflows for git branching so search around and you might find one you prefer.
You always start from the master branch - which is the most stable and working version of you code - checking out a new branch to do your next piece of work. When you’re ready for your work to be reviewed and merged into the master branch of the project you open a merge request to master.
N.B. Even if you’re a solo developer on a project, I still recommend you use this the process of making branches and opening merge requests as it serves as a record of your work - it is your lab-notebook.
When you create a branch in your project, you’re creating an isolated copy/environment where you can try out your new ideas. Changes you make on one branch do not affect the other branches, so you are free to experiment and commit changes, safe in the knowledge that your branch won’t be merged until it’s ready to be reviewed by someone you’re collaborating with.
N.B. Branching is a core concept in git and the entire git workflow is based upon it. There’s only one rule: anything in the master branch is always deployable/usable.
Creating branches
Lets actually create a branch:
We will do this in the gitlab webpage... make an "update-mars-file" branch
(#TODO insert a screenshot here)
Your branch name should be descriptive (e.g., parallelize-function-a), so that others can see what is being worked on.
Now, once your branch has been created, it’s time to start making changes… pull your branch to your machine:
What branch are we on now?
git status
Now fetch the upstream changes:
git fetch
git fetch downloads commits, files, and refs from the remote repository into your local repo. Fetching is what you do when you want to see what everybody else has been working on. Git isolates fetched content from existing local content and it has absolutely no effect on your local development work. Fetched content has to be explicitly checked out using the git checkout… lets do that now:
git checkout update-mars-file
You can now make your changes in this ‘copy’ of the code and commit, push/pull until your heart is content.
You can also work on many branches at once but “checking-out” the other branches when you want to work on them.
Merging & Review
“Merge requests” initiate a discussion about the commits you made in your branch.
You can open a Merge Request at any point: when you have little or no code but you just want to share some general ideas, or when you’re stuck and need help or advice, or when you’re ready for someone to review your work. By using GitLab’s @mention system in your Merge Requests and messages, you can ask for feedback from specific people or teams.
Lets do it - first push your local code back up to the remote:
git push origin update-mars-file
Now go to the gitlab webpage and create a merge request:
we will do this on the gitlab webpage... (#TODO insert a screenshot here)
Once a Merge Request has been opened, the person or team reviewing your changes will have questions or comments. Merge Requests are designed to encourage and capture these conversation and feedback.
N.B. You can also continue to push to changes this branch in light of discussion and feedback about your commits. If someone comments that you forgot to do something or if there is a bug in the code, you can fix it in your branch locally and push up the change. GitLab will show your new commits and any additional feedback you may receive in the unified Merge Request view.
do a simple review process on gitlab webpage... and then merge it... (#TODO insert a screenshot here)
Once your Merge Request has been reviewed and the branch passes your tests, you can merge your changes into master which will eventually be used as a release to “production”. Deploying to production won’t be covered here. Once merged, “Merge Requests” preserve the record of the historical changes to our code. Because they’re search-able, discoverable, and they let anyone go back in time to understand why and how a decision was made.
Acknowledgments
Most of this content came from the wonderful work of Software-Carpentry https://swcarpentry.github.io/git-novice/ that i have mixed and matched and extended into bracnhing and review.